donderdag 31 oktober 2013

Busy Fingers Showing Off! #21

I am keeping it short this week. I am really sorry but I have been busy with IRL more than on here.... I haven't visited any of your links! I am going to try and visit you after this post.

But what did the other visitors think of your crafty projects?

Here is the top three:

Number 1

 
Mandala made by Renate @ Renate's haken en zo

Number 2

Adorable bunny hat made by Rianne @ Rianneshaaksels

Number 3
Zeist-Vollenhove
This is an awareness project, people make little men from found garbage they find at sites and they each hold a cup to make people aware they should dump their trash in a can @ Trashii Can

Want to show off?
Did you make something nice and creative that you are very proud of?

Please link up in the Link Party this week!


maandag 28 oktober 2013

~ Monday Music ~

Are you in for a laugh? Don't click on it if you are at work! :)


zondag 27 oktober 2013

Unexpected Events


I wished for a nice relaxed Autumn vacation, and for the biggest part it worked out like I wished.
We went to a play forest and petting zoo on Tuesday, and to a big zoo on Wednesday. The rest of the week was filled with lounging on the couch, loads of laundry, playing outside, working in the garden, writing on my new feature, and decluttering and getting rid of a lot of stuff. Our house is getting more and more tidy.
Unfortunately (and that is why I am keeping this post short) bad news arrived from school. One of my dear colleagues had a stroke in the first weekend of the vacation and passed away on Tuesday. I don't know what is going to happen next week, but it will be a very strange week.
And yesterday more sad news came our way. Big Man's grandfather, Pépé, had a severe stroke, and was found by his partner at home. He is conscious, but we don't know how he is doing and what the effects of the stroke will be. I am hoping and wishing for a few good years for him....
I hope I will have some good news somewhere next week..
Enjoy your Sunday and cuddle your loved ones!

X
Barbara

vrijdag 25 oktober 2013

Pattern: Ton Sur Ton Coasters


What to do with brown, tan and cream yarn? Not the average colour explosion as you would usually see in crochet projects! I thought it would be nice to use them up in a small project, a little house thing that doesn't need to be ooh' ed and aah 'ed to.

A few coasters! I barely had enough of the tan so these were perfect.

This pattern consists of a chart only and a few notes so it is quite different from my other patterns. Please let me know what you think of it! I made a tutorial about the Back Post Double Crochet to accompany this pattern, here it is!

General information

Skill level
Advanced beginner

Special Stitches
Bpdc: back post double crochet, make a dc around the post of a dc in the previous round by inserting the hook at the back of your work from right back to left back.

Abbreviations
Ch: Chain
Sl st: slip stitch
Sc: single crochet
Hdc: half double crochet
Dc: double crochet
Sk: skip
Sp: space

Notes
This pattern consists of a crochet chart only. Here is what you should pay attention to: If you are making rounds in the same colour, slip stitch to a corner chain space and start the round in that chain space. If you are changing colours, attach new colour in a corner chain space. For the last round I only included symbols for a few stitches and the corner sequence. Along the sides you slip stitch in the back loop only and in the corner chain spaces you make a (sc, ch3, sc) group. Always slip stitch to the first stitch of a round to close off a round.

Finished measurement
4.75 inches wide

Materials
Phildar light worsted cotton
Crochet hook size 3.5 mm


Linking up at:
Crochet Addict UK I've Made Friday

How To Make a Back Post Double Crochet


So, I wanted to work more with structured stitches! And I had some lovely leftovers of cotton yarn.
For today's pattern I used the Back Post Double Crochet, or the BPDC as it is known. It creates a nice ridge and interesting colour play.
Here's a tutorial on how to make this stitch!
*Note: I made a mistake.... I accidentally skipped a dc on the side (you will see it in the last picture) but the steps are correct. The pattern itself is correct!*

 
Make a yarn over.

 
 Keep your hook at the back of your work and insert the hook from right back, around the post of the dc, to the left back.

 
This is what it looks like from the back of your work.

 
This is how it looks like at the right side of your work.

 Make a yarn over.

 
Pull through two loops.

 
Make a yarn over, and pull through the last two loops.

 
Here's what it should look like. The top loops of the cream rounds are facing to the front because of the tan round. And you can see my missed stitch :)

Have fun with the tutorial!


donderdag 24 oktober 2013

Busy Fingers Showing Off! #20

It was a small party last week, but I think we had some lovely projects! With two kids hovering around me I am making a quick new party as they try to type with Lego horses on my laptop as we speak....

Here is the top three!

Number 1

 
Ubercute mousy from Helena @ Helena Haakt

Number 2

 Ghost cushion (with link to the pattern!) made by Liz @ Howling at the moon

Number 3

 Preemie Bobble Blanket by Linda @ Linda's Crafty Corner


Thank you so much for linking up, I got many new ideas. I really really want to have a go at this bobble stitch!

I will be pinning you all on Pinterest, and hopefully will see you all on this weeks Party!

woensdag 23 oktober 2013

Lactosefree Cooking: Brussels Sprout Pie / Spruitjestaart


 After posting this picture on my Facebook page I had a request for the recipe of the sprout pie I was going to make with these lovely sprouts!
Here it is, in lactose free form, in both English and Dutch. If there is no need to make it lactose free, just use normal cooking cream.
Nadat ik bovenstaande foto had geplaatst op mijn facebook pagina kreeg ik het vriendelijke verzoek of ik het recept voor spruitjestaart wilde plaatsen. Bij deze!

Here we go!

Ingredients
750 grams of Brussels sprouts (cleaned and cut at the bottom)
8 pieces of puff pastry
100 grams of pecan nuts
200 grams of bacon bits (squares)
100 grams of grated cheese (Gouda)
25 grams of butter
1 onion, chopped
salt, pepper, nutmeg
4 eggs (3 works fine too)
200 ml/250 ml of Soja Cuisine cooking cream
Spring cake tin

Preheat the oven at 200 degrees Celsius. Clean the sprouts and cook them for 4 minutes in boiling water. Pour off the water and cut big sprouts into halves if necessary. Peel the onion and chop into small pieces. Defrost the pieces of puff pastry until they are pliable. Chop up the pecan nuts (not too small). Spread the puff pastry pieces evenly over your spring cake tin. Use your fingers and thumbs to press them together and close off holes between the pieces. Prick a few tiny holes in the bottom puff pastry layer with a fork (this will make it more airy).
Take a pan and fry the onion with the small bacon bits for about 2 minutes in hot butter. Stir in the nuts and the Brussels sprouts and add salt, pepper and nutmeg to taste.
In a bowl, whisk together the eggs, add the Soja Cuisine and some Italian herbs and a bit of cheese.
Spread out the sprouts/nuts/onion mixture over your puff pastry, sprinkle the rest of the grated cheese over the sprouts and pour the egg/cream mixture over it.
Bake the pie for about 35-40 minutes.


Spruitjestaart

Ingredienten
750 gram spruitjes (schoongemaakt)
8 lapjes bladerdeeg
100 gram walnoten/pecannoten
200 gram magere spekblokjes
100 gram geraspte kaas
25 gram boter
1 ui
peper, zout, nootmuskaat
4 eieren (3 eieren gaat ook prima)
2 deciliter kookroom of Soja Cuisine (een heel pakje gaat ook best!)
Springvorm

Verwarm de oven voor op 200 graden Celsius. Maak de spruitjes schoon en kook ze 4 minuten in water met zout. Giet ze af en spoel er koud water over. Laat ze goed uitlekken en halveer grote spruiten. Pel de ui en snipper deze. Laat de deeglapjes ontdooien. Hak de noten grof. Bekleed de licht ingevette vorm met de lapjes bladerdeeg. Druk de randen van het deeg met duim en wijsvinger tegen elkaar. Prik in de bodem hier en daar gaatjes me teen vork. Fruit de ui met de spekblokjes 2 minuten in de hete boter. Schep de noten en het ui/spekmengsel door de spruitjes en voeg peper, zout en nootmuskaat naar smaak toe. Klop de eieren los met de kookroom. Schep het spruitjesmengsel op het deeg in de vorm. Verdeel de geraspte kaas erover en giet het ei/roommengsel erop. Baktijd in een voorverwarmde oven op 200 graden gedurende 40-45 minuten.

Bon Appetit!


dinsdag 22 oktober 2013

How To Join New Yarn/Colour In A Project

 
I have been wanting to do this Tut for ages! After a comment made in a crochet group I'm in I was even more desperate to put this on the net. And today (Monday actually) with the kids off at daycare and being alone at home I finally found some time to make some pictures.

Does anyone make knots if you are running out of yarn?

I am very hesitant to make knots in my knitting/crochet projects...

When I was learning how to knit, I came to the end of my ball of yarn and read in my "Knitting for Dummies" book the following phrase (or something like this):

If you are to make a knot between your old end and your new end, be aware it can shift and show on the right side of your work. Weaving in ends is a better option."
I never ever used a knot. Simply because I do not want it to show. So I weave in my ends, although I really despise it.

But how do you switch from your last bit of old ball of yarn to a spiffy new ball of yarn?

Here's how to.

And to have a bit of fun I am turning this tutorial into a "kill two birds with one stone" kind of tutorial.
You can either follow the tutorial for using the same kind of yarn if you are running out, OR when you want to use multiple colours in your project and you need to have a good distinction between stitches of colour A and B.


Here we go: two different colours of yarn which represent both colours or the same colour. The principle is the same!


O dear. If you are running out of yarn, leave a piece of about 7" or 15 cm dangling behind your work.


Make your next stitch (in this case a double crochet) up until you need to make the last step. Do not do this last step!


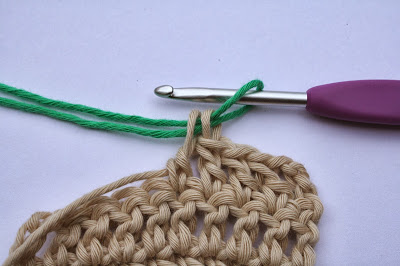
Grab your new end or your new colour, leave about 7" or 15 cm dangling and make a yarn over over your hook, taking care not to work with your end.


With your new yarn/colour finish off your stitch.


Here we clearly see that there is a complete cream double crochet stitch next to a complete green double crochet stitch. No mingling!


A view on the back: you will have two ends that need some weaving in. I always work one end to the left and one to the right.


Now, what if you are going to switch from one ball to the other or one colour to the other at the end/beginning of a row?


Actually, it is the same technique. Work your last stitch up until the last step. Grab your new yarn.


Put the yarn over your hook.


Make your last step.


Turn your work (if you are working in rows) and cut off your old colour leaving about 7" or 15 cm of yarn.


Make a starting chain with your new yarn and start working your row as you would like to.


There is another option though!


You can also finish off with your old colour.


Put your hook in between the first and second stitch.


Put your new yarn over your hook.


Pull through from back to front.


And make your starting chain!


It looks a bit sloppy now, but after weaving in your ends you will not see any blurring of colours. It will look very crisp and clean.

I hope you enjoyed this tutorial!
If you have any questions, please do not hesitate to ask.

maandag 21 oktober 2013

~ Monday Music ~

Just a beautiful song. One I hadn't heard in a long time...


Autumn Vacation


It has been a bit of a "backstage" week, as I was MIA over here. It was filled with doing the last things before the Autumn vacation. Prepping the last lessons. Collecting papers for grading.
Feeling exhausted.
But trying to keep myself occupied with the kids and enjoying them.
Autumn is peeking around the corner at the moment. Because of the rain during the last weeks Nature decided to postpone the onset of Autumn in the Netherlands. Finally the trees are starting to fade into their yellow colour, and tips of leaves are turning red.
In a week or two it will be definately Autumn.
But for now I am going to enjoy a week of nothing. As if doing nothing exists over here. No, what I mean is that I really really like the idea of a week of not having to race to school, no working hours. Just days to fill in just as we want.

Happy Autumn vacation!

P.S. I've hinted here and there to a certain thing that is going to happen. In a week, maybe two, there will be a new feature on the blog. I am working very very hard and am immensely excited!

Ik ga toch maar weer een beetje proberen tweetalig bezig te zijn hier!
Zoals jullie wel gemerkt hebben is het aardig rustig op dit plekje. Ik had mijn laatste week op school voor de herfstvakantie en dat was toch wel drukker dan verwacht met nakijkwerk verzamelen en de laatste lessen voorbereiden.
Ik heb heel hard geprobeerd om vooral relaxed te blijven en te blijven genieten.
Het valt me enorm op dat de bladeren aan de bomen nog niet hun herfstige uiterlijk hebben gekregen. Waarschijnlijk heeft dit te maken met de regen die maar bleef komen de laatste weken. Gelukkig is het verkleuringsproces aan de gang en gaat het toch echt echt Herfst worden.
Nu, nu ga ik lekker een weekje 'niks' doen. Als in; geen gerace naar school, geen werktijden waar je rekening mee hoeft te houden. Gewoon lekker zelf inplannen deze dagen.

Een hele fijne herfstvakantie voor iedereen!

P.S. Ik heb de afgelopen tijd wat hints laten vallen dat er iets gaat gebeuren. Over een week, uiterlijk twee, gaat er een nieuwe feature op de blog van start! Ik heb er heel veel zin in om jullie te laten zien waar ik de afgelopen tijd aan heb gewerkt!